
01 / Before you begin
What TerrainLogic does, and what it does not do.
TerrainLogic is a local-first conservation-planning application. It combines field boundaries, public soils and climate records, elevation data, management operations, daily hydrology, RUSLE2-aligned sheet-and-rill erosion modeling, planning-level nutrient accounting, potential gully hotspot screening, and preliminary engineering workflows.
TerrainLogic supports screening, planning, comparison, documentation, and preliminary design. It does not replace field verification, surveys, state Field Office Technical Guide criteria, approved hydrology, permits, utility checks, engineering judgment, or certification by a qualified professional.
Recommended preparation
- Know the field name and approximate location.
- Have a field boundary file, street address, or enough map context to draw the field.
- Know the crop, vegetation, tillage, field operations, and approximate dates.
- For nutrient tracking, gather fertilizer, manure, soil-test, and initial nutrient information if available.
- For engineering work, gather approved hydrology, survey data, and current state criteria whenever available.
02 / Access and installation
Install the signed beta.
- Open the beta portal.Go to beta.contourstack.com and enter the exact email address approved for beta access.
- Verify your email.Cloudflare sends a one-time code. Enter the code in the browser to open the protected download page.
- Download the installer.Choose the signed, time-limited TerrainLogic beta installer. Keep the installer in Downloads until setup is complete.
- Run setup.Open the installer, approve the verified ContourStack LLC publisher prompt, and follow the installation steps. A previous TerrainLogic installation can normally be updated in place.
- Launch TerrainLogic.Use the Start menu or desktop shortcut. The first start is slower while the local runtime initializes; later starts are substantially faster.
The time-limited beta begins at first launch. When the active period ends, the application may enter a limited read-only grace period so existing records can still be reviewed or exported.
System baseline
TerrainLogic has completed full workflows on Windows 11 with an Intel Core i3-10110Y, 8 GB RAM, Intel UHD integrated graphics, and a 128 GB SSD. A dedicated graphics card is not required. Allow at least 5 GB of free storage.
03 / Home and quick start
Choose the workflow that matches the job.
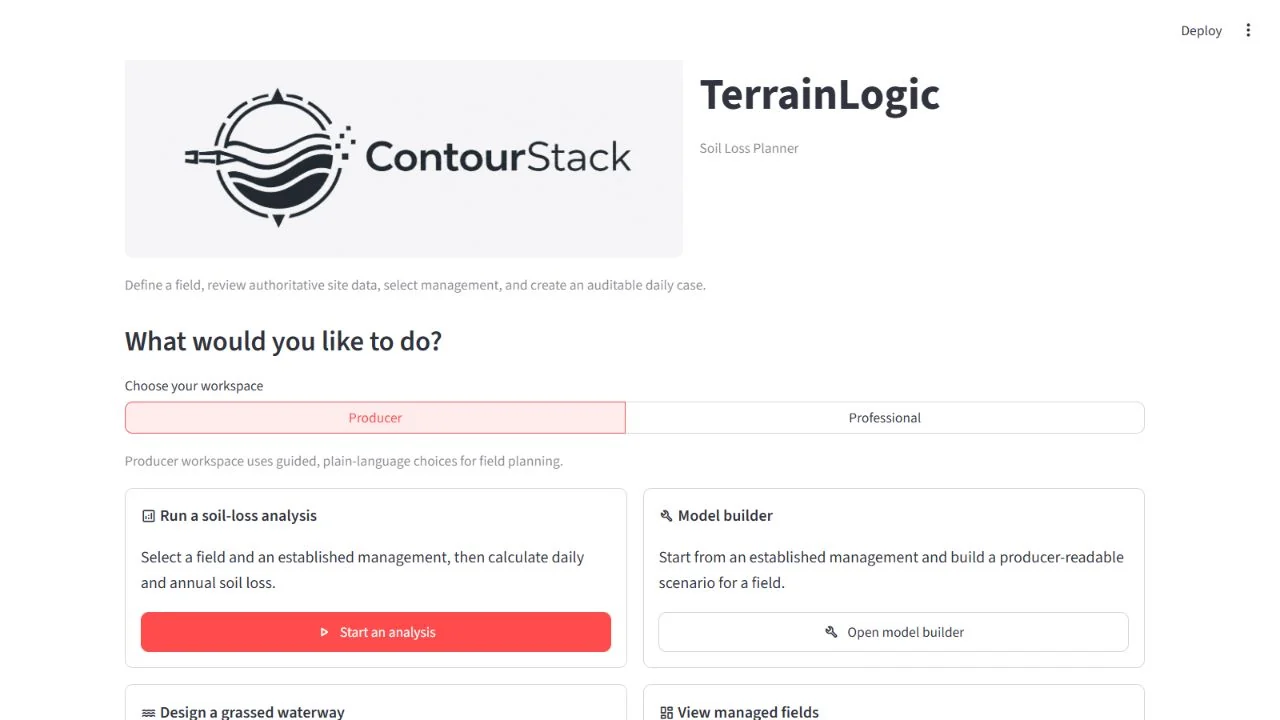
Start an analysis
Select a field, characterize the site, build a management, run erosion and optional nutrient models, screen terrain, and create reports.
Open model builder
Create or edit a reusable management schedule without first selecting a field.
Open waterway designer
Use a saved hotspot or select a new site and proceed directly to DEM processing, gully mapping, and preliminary waterway design.
Open terrace designer
Use a saved field or select a new site for DEM-based preliminary terrace layout and design.
Open managed-field dashboard
Filter saved fields, compare managements, add custom columns, review histories, and reopen reports or engineering records.
Producer and Professional workspaces
Producer uses guided activities and relative timing. Professional exposes exact operations, dates, residue quantities, detailed nutrient inputs, and technical records. Both use the same engine; the difference is how inputs are collected and displayed.
04 / Select a field
Name the project, then define its boundary.
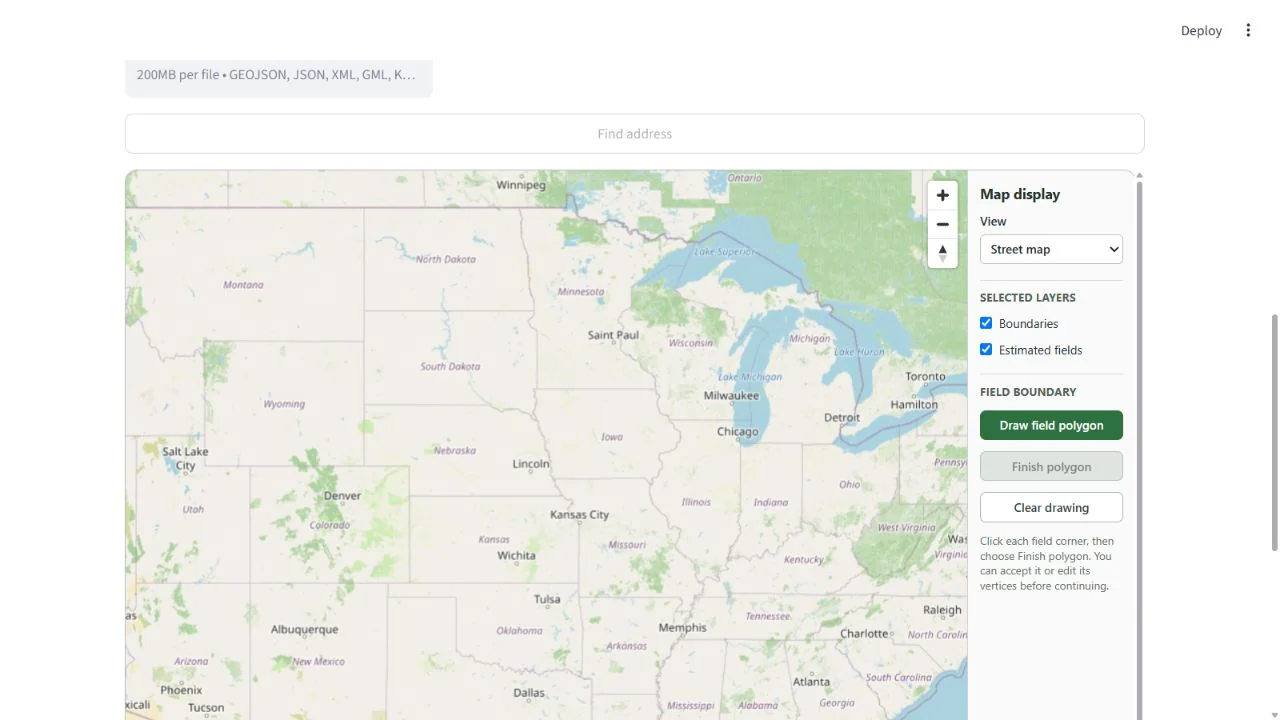
- Enter the field name.This title follows the field through reports, managed-field records, and engineering outputs.
- Confirm the local repository.TerrainLogic selects the local managed-field location automatically. Change the project folder only when your office uses a different local storage location.
- Choose new or existing.Select a new field, or load a managed field to continue its history or compare a proposed scenario.
- Define the boundary.Upload GeoJSON, JSON, XML, GML, KML, GeoPackage, or a ZIP containing a shapefile; search an address and choose a suggested USDA boundary; or draw a polygon manually.
- Review and edit.Move vertices if needed, then accept the edited boundary. On a touchscreen, place at least three points and use Finish polygon.
- Continue.TerrainLogic enables the next step after the name, repository, and valid geometry are present.
Continue field history carries the saved ending state into a new authored run. View a proposed scenario compares a new management without replacing the field's current authored history unless you explicitly save it.
If the boundary contains detectable fertilizer or manure records, review the imported entries before applying them. Imported data should never be assumed correct without user review.
05 / Review site data
Verify the public-data interpretation.
After field selection, TerrainLogic resolves the county, state, climate context, Crop Management Zone, soil map units, soil-loss tolerance T, soil erodibility K, hydrologic soil group, elevation, slope, slope length, and LS context. Review the displayed source and warning messages before modeling.
| Item | What to check |
|---|---|
| Location | County, state, field centroid, and climate station or erosivity context match the intended field. |
| Soils | Dominant SSURGO components, K, T, and hydrologic group are reasonable for the mapped field. |
| Topography | DEM coverage, representative slope, slope length, and LS do not appear distorted by roads, water, structures, or boundary placement. |
| Warnings | Edge-truncated catchments, missing public data, fallbacks, or user overrides are understood and documented. |
Use an override only when better site-specific information is available. TerrainLogic records selected sources, fallbacks, and overrides in the data and assumptions audit.
06 / Build management
Select a library practice or author the actual field sequence.
Use the management library
- Select annual, perennial, pasture, woodland, or the available duration category.
- Choose the production system and crop or practice.
- Search by terms such as no-till, grazing, corn, or mulch.
- Select the closest practice, then review its operations and timing.
Build a custom management
- Choose a library record as a starting point or begin with a new custom model.
- Enter a management name and duration.
- In Producer mode, select activity categories, vegetation, and relative timing. In Professional mode, select exact operations and dates.
- Add residue or mulch amounts where applicable.
- Review the event table, edit values, add or remove activities, and verify chronological order.
- After a successful run, save the reviewed management to the local TerrainLogic library if it should be reused.
Planting, harvest, tillage, grazing, residue handling, irrigation, and other operations affect daily cover, biomass, roots, residue, hydrology, C, and soil loss. Do not select a management only because its name appears similar.
07 / Nutrient inputs
Turn on nutrient tracking when the required evidence is useful.
Enable Model nutrient tracking to produce planning-level nitrogen and phosphorus balances tied to the same daily management and hydrology used by the erosion run.
Inputs you can provide
- Fertilizer and manure applications, forms, amounts, placement, and timing.
- Starting nitrate and ammonium pools.
- An optional initial labile phosphorus pool.
- Soil-test phosphorus for APLE-related dissolved-P screening.
- Mixing depth, bulk density, curve number, rooting depth, initial water, field capacity, and wilting point.
- Crop-stage nitrogen and phosphorus tissue concentration assumptions.
- Detected nutrient entries imported with the field record, after review.
If starting soil pools are not supplied, TerrainLogic identifies them as unsupplied, not measured zero. Where the model estimates crop inventory from biomass, the report distinguishes modeled transfer from unmeasured soil supply from fertilizer, fixation, or newly created nutrients.
These are screening-level planning estimates based on published APLE and APEX relationships and the TerrainLogic daily hydrology. They are not fertilizer recommendations, certified nutrient-management plans, or substitutes for soil, manure, water, or tissue testing.
08 / Supporting practices
Represent the practices that change erosion or water movement.
Select contouring when it is present and applicable. Optional controls allow strips or barriers, diversions or terraces or sediment basins, and subsurface drainage. Choose the closest named system and verify that its assumptions fit the field.
Supporting-practice selections influence the modeled scenario but do not certify that a practice is installed, functional, or compliant. Existing practices should be confirmed in the field.
09 / Run and review
Read the result as a connected field record.
Select Run soil-loss analysis. TerrainLogic builds the case, processes daily states, applies erosion factors, runs optional nutrient accounting, screens terrain, and saves the local result.
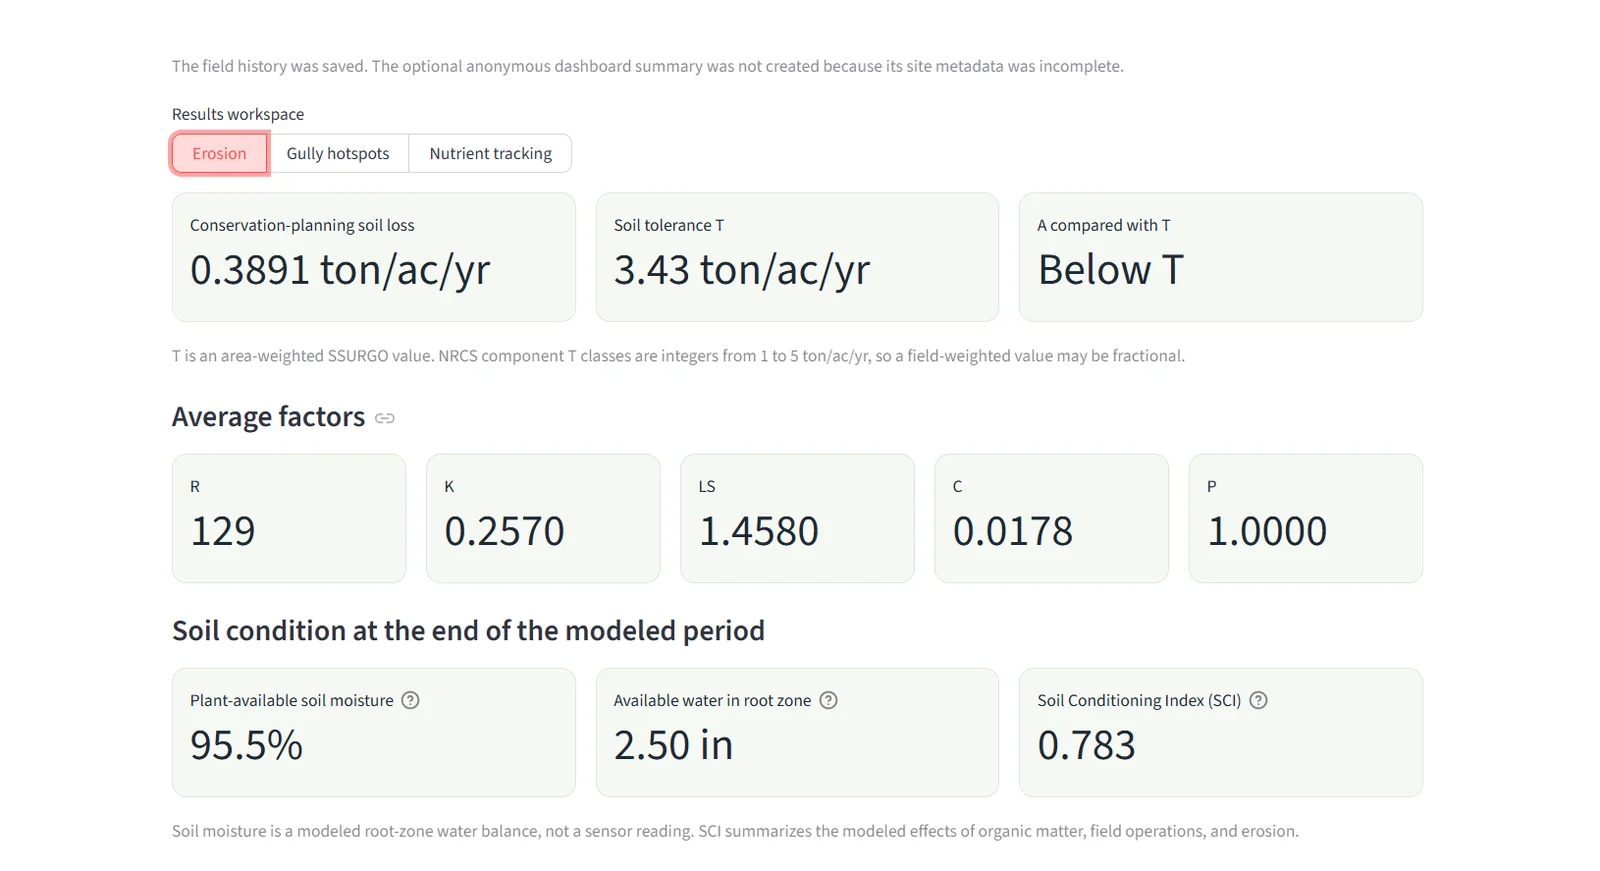
Erosion results
- Annual sheet-and-rill soil loss A and soil-loss tolerance T.
- Pass or fail interpretation when T is available.
- R, K, LS, C, P, management, soil, and topographic context.
- Weekly A and R views for seasonal interpretation.
- Current versus proposed management comparison when a baseline exists.
Potential gully hotspots
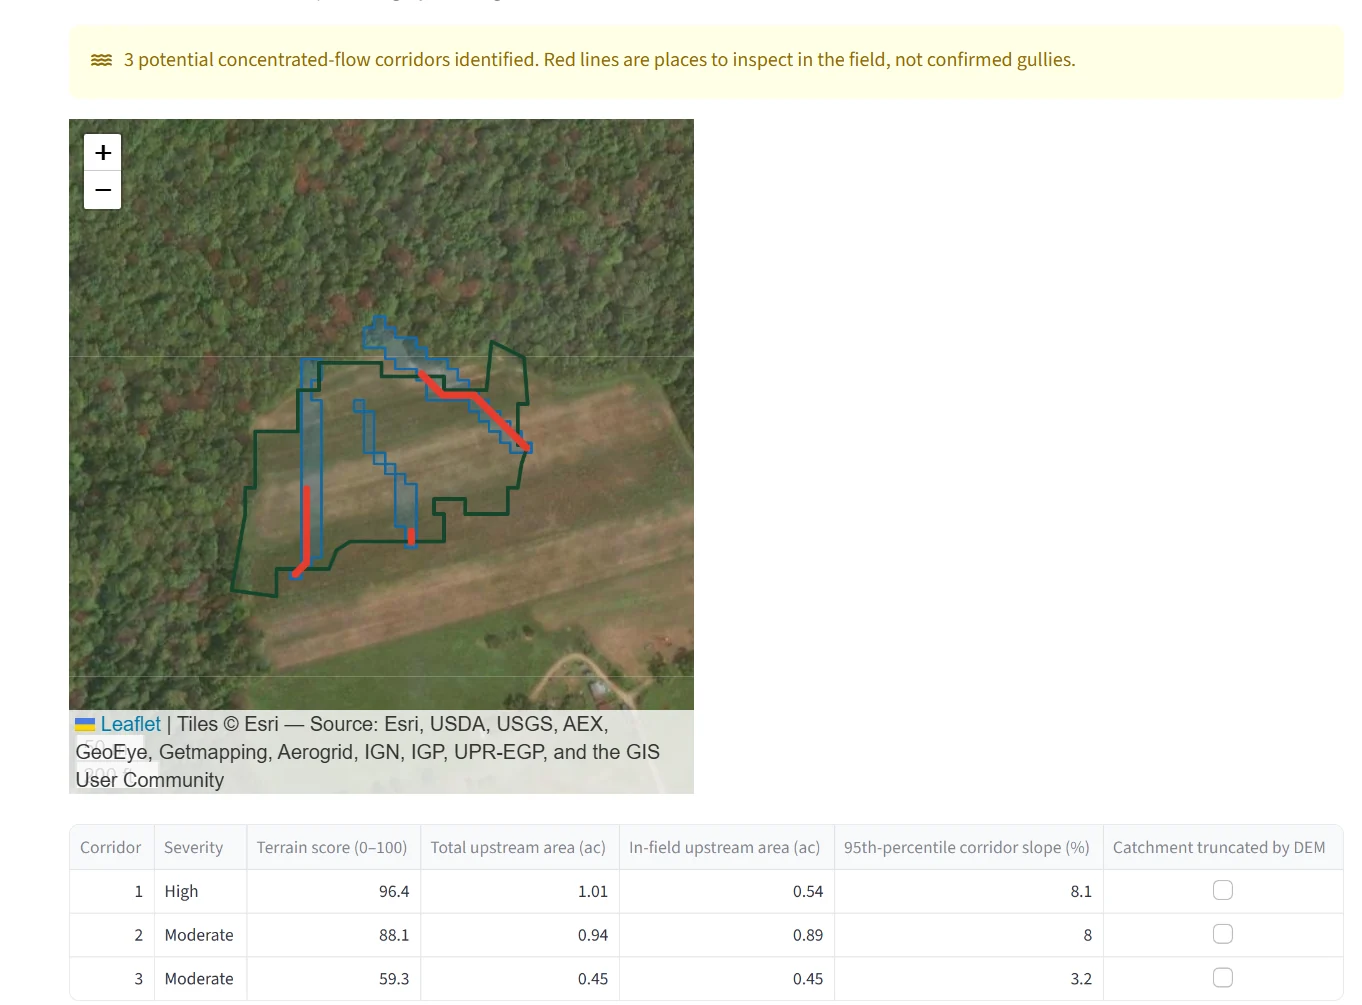
Review each corridor's terrain score, severity, total and in-field contributing area, longitudinal grade, reach length, local slope, and whether its catchment reaches the analysis edge. A selected corridor can be handed directly to the waterway designer.
Nutrient results
When enabled, review opening and ending pools, additions, crop uptake and removal, residue and root returns, fixation, sediment-bound losses, dissolved runoff, leaching, gaseous loss, net N and P balances, and mass-balance audit status.
At the bottom of the results page, download the manifest, daily JSON, and weekly graph. If the run used a custom management, save it to the reusable local library only after reviewing the result.
10 / Reports and files
Create the record that matches the decision.
Erosion report
Professional PDF with site, management, factors, A versus T, graphs, methods, and limitations. Save to a chosen path or download it.
Data and assumptions audit
Concise reproducibility record for source selection, factor methods, management, topography, soil, climate, fallbacks, overrides, and saved-state initialization.
Full daily report
Printable day-by-day ledger of operations, weather, irrigation, biomass, roots, residue, cover, PLU, daily C, rooting depth, and available soil water.
Nutrient tracking report
Opening and ending pools, inputs, fixation, uptake, crop removal, losses, assumptions, and mass-balance audit.
Gully hotspot report
Mapped screening corridors, metrics, severity, interpretation, and the field-verification boundary.
Comparison report
Current and proposed management results with an explicit baseline and scenario record.
Project case folders also retain machine-readable files such as manifest.json, result.json, daily.json, and daily_state.json. Do not edit these files unless you are intentionally working with an exported copy.
11 / Engineering tools
Start from an analyzed field or go directly to engineering.
Waterway and terrace tools can receive a saved field and hotspot context from an analysis. They can also begin with a new field boundary from the home screen. A direct engineering site runs the required DEM processing and gully screening without first running the full RUSLE2-aligned management analysis.
Engineering tools document equations, assumptions, criteria checks, and survey inputs. Final design still requires current state FOTG review, approved hydrology, field survey, outlet assessment, utilities and permitting review, construction details, and qualified approval.
12 / Grassed-waterway workflow
Carry a screened corridor into a documented section.
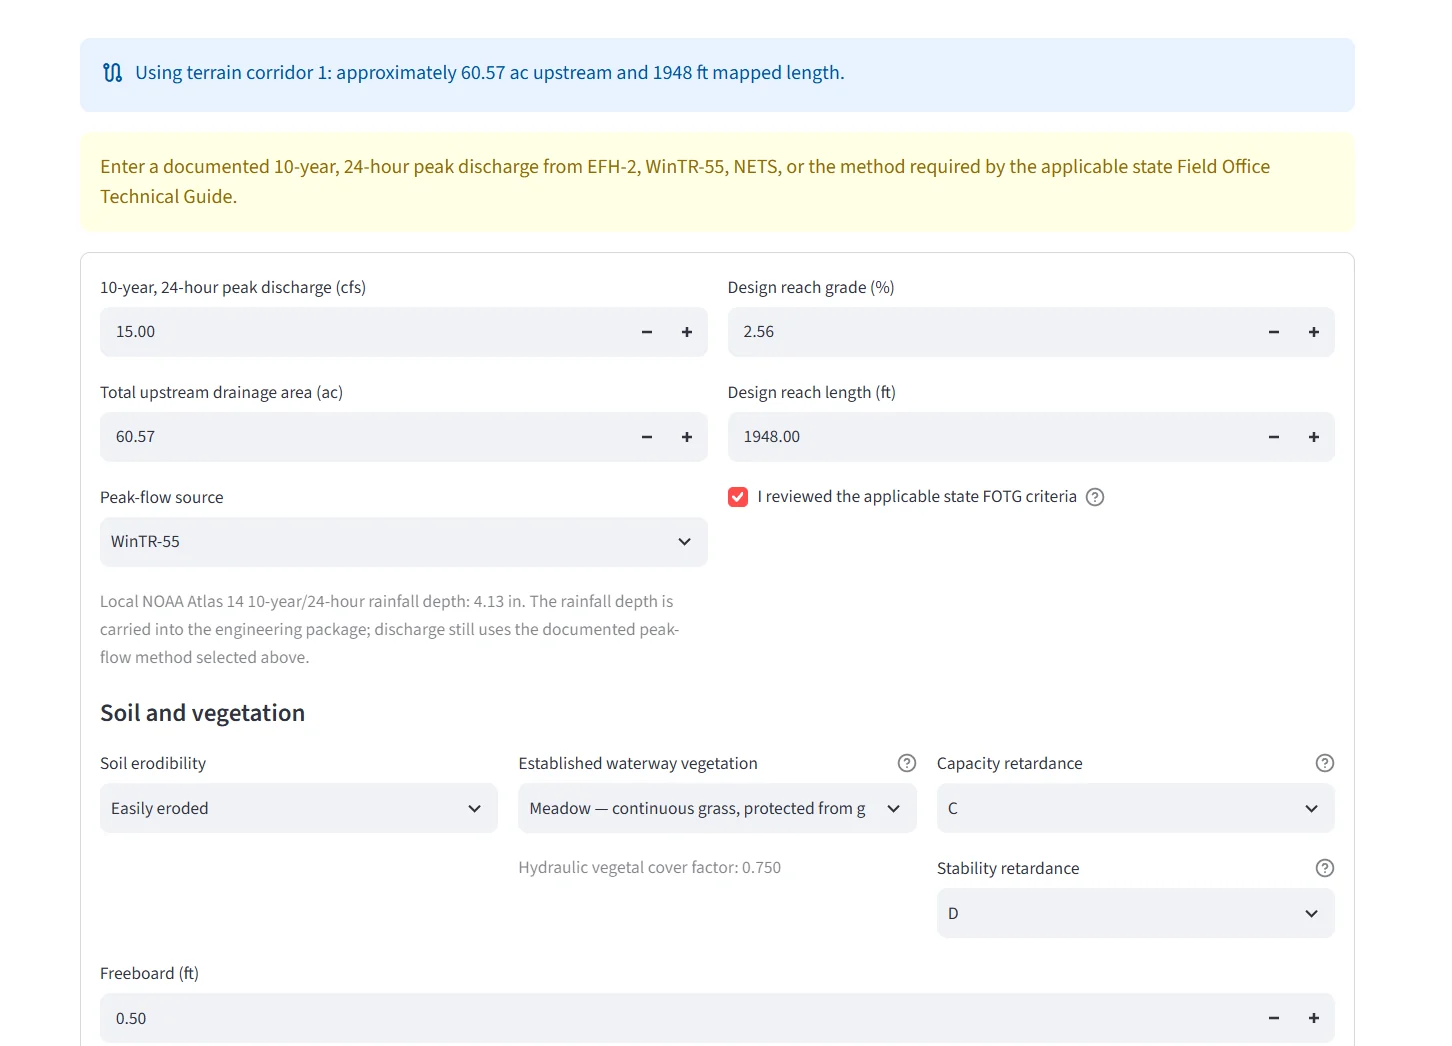
- Select the site and corridor.Use a hotspot from the field analysis, a saved design context, or a direct engineering field selection.
- Enter hydrology.Provide peak discharge, drainage area, hydrology method or source, grade, and reach length. Confirm that applicable state criteria were reviewed.
- Choose soil and vegetation.Select the lining and resistance assumptions appropriate for the site, then enter freeboard.
- Calculate the preliminary section.Review capacity, velocity, depth, width, stability checks, and every warning. If an office preference is used, recalculate and verify the modified section.
- Add survey data.Enter station and existing-ground elevations. If a control elevation is known, enable it and enter the control. Build the profile and review grade continuity.
- Export and save.Download the stakeout CSV and engineering report. Give the design a clear name and save it to the managed field.
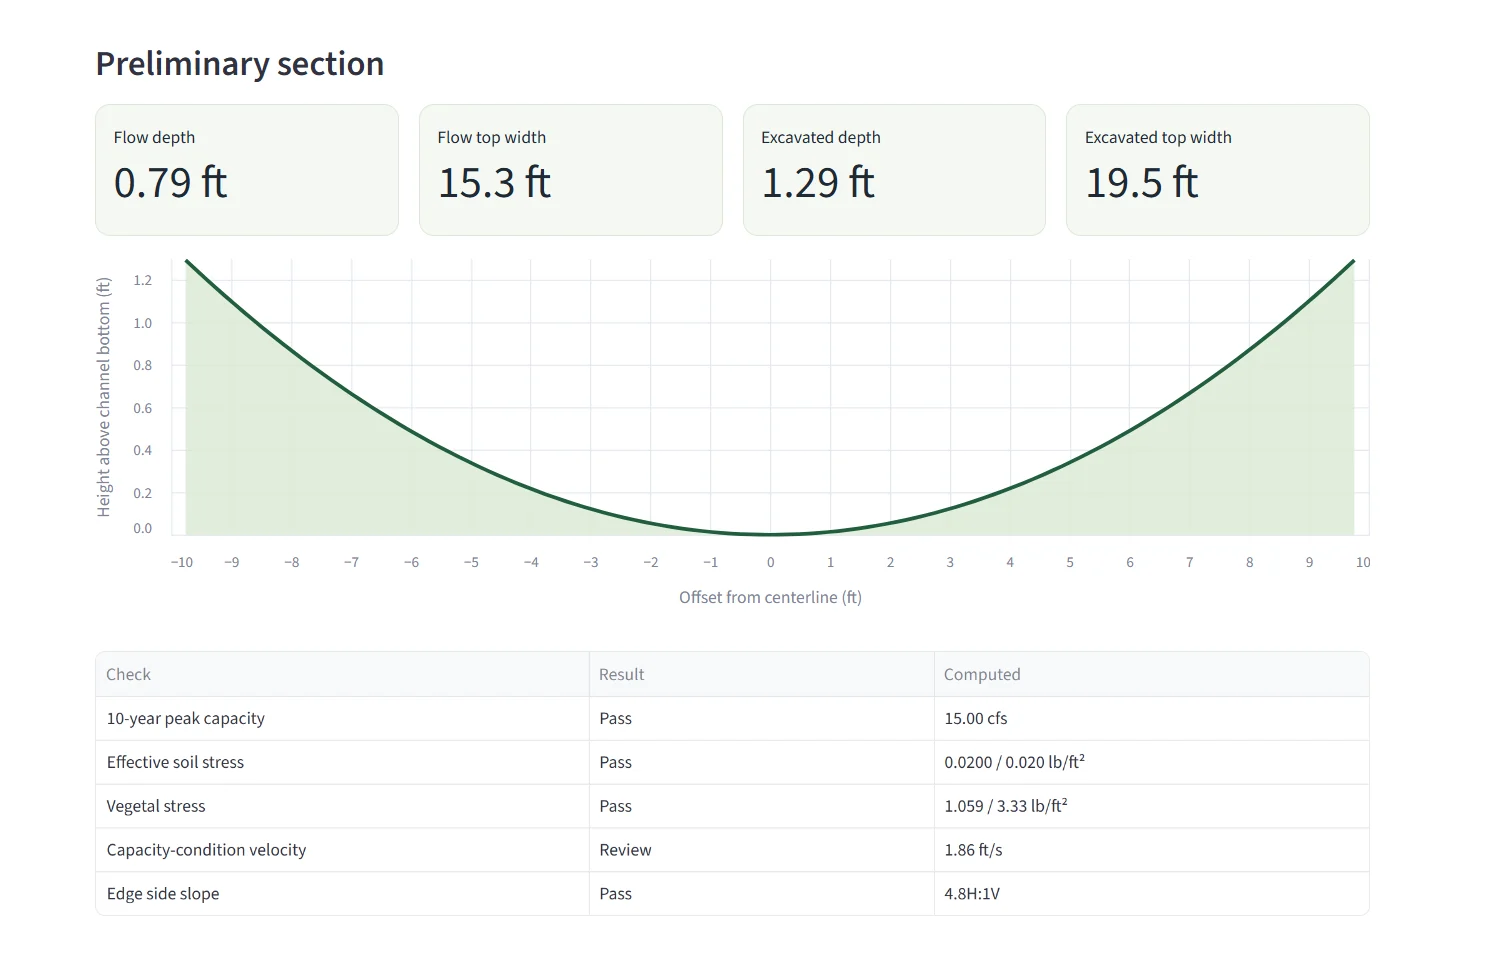
As-built inspection
Open a saved waterway, enter measured cross-section data, inspector, inspection date, tolerance, notes, and certification. A passing inspection can mark the practice built. A failed inspection records corrective action required.
Routine inspection
Record vegetation condition, outlet stability, channel obstruction, active erosion or headcutting, sediment-related capacity loss, damaging traffic or ruts, notes, and inspector certification. The result is stored as passing or maintenance required and can be included in the practice inspection report.
13 / Terrace workflow
Use terrain to propose a system, then verify the design.
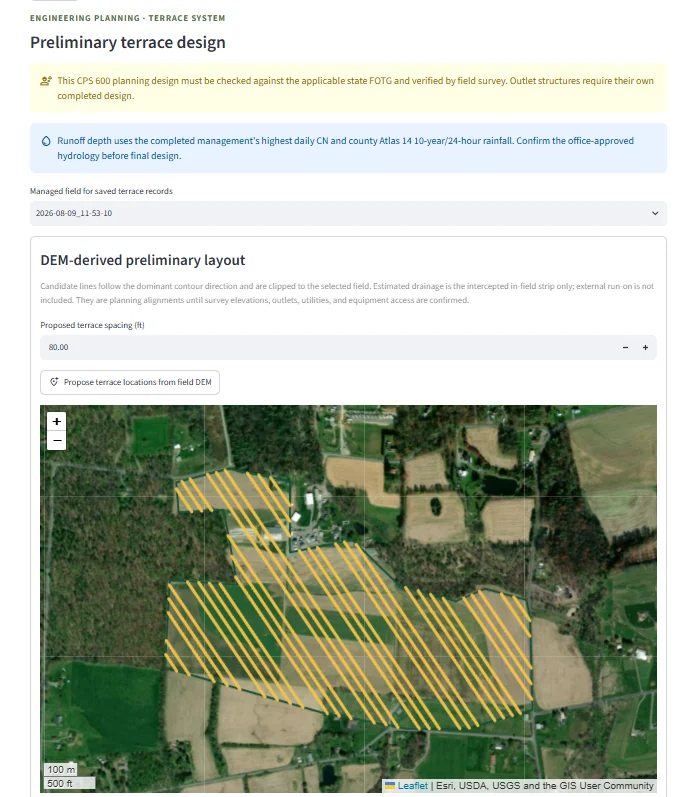
- Select the applicable terrace standard.Use the current state and practice context.
- Propose locations from the field DEM.Enter the proposal spacing, generate candidates, review each line, and send the preferred candidate into design.
- Enter hydrology and geometry.Document the hydrology source, flow and section assumptions, grade, dimensions, and cut-fill ratio.
- Confirm FOTG review.Check the acknowledgement only after reviewing the applicable state criteria.
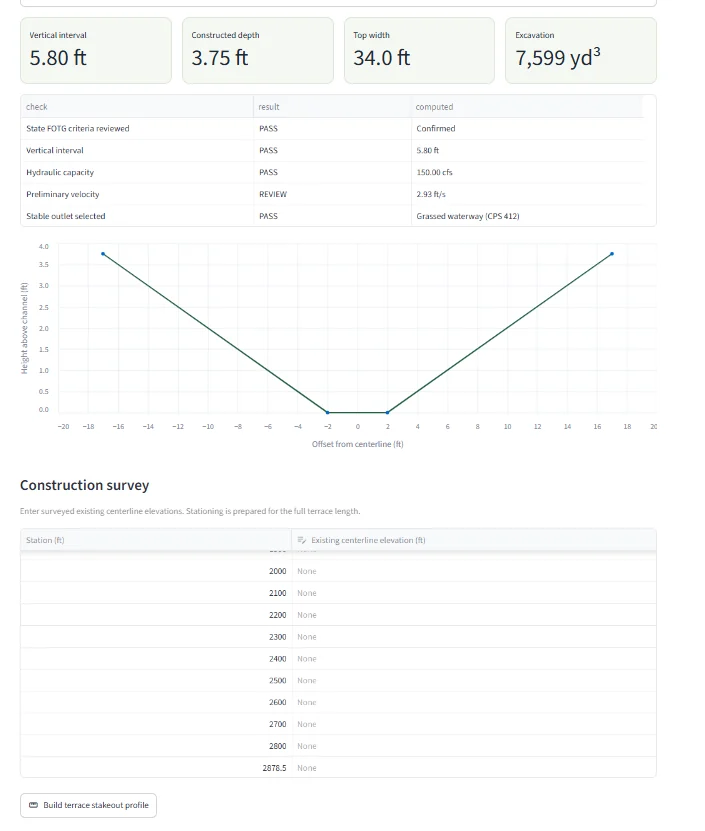
- Calculate and inspect.Review capacity, velocity, dimensions, spacing, and warnings. Revise inputs rather than accepting an invalid result.
- Build the stakeout profile.Enter survey stations and elevations, then generate the preliminary profile.
- Export and save.Download the terrace engineering report, name the system, and save it to the managed field.
14 / Managed fields
Use the dashboard as the local field record.
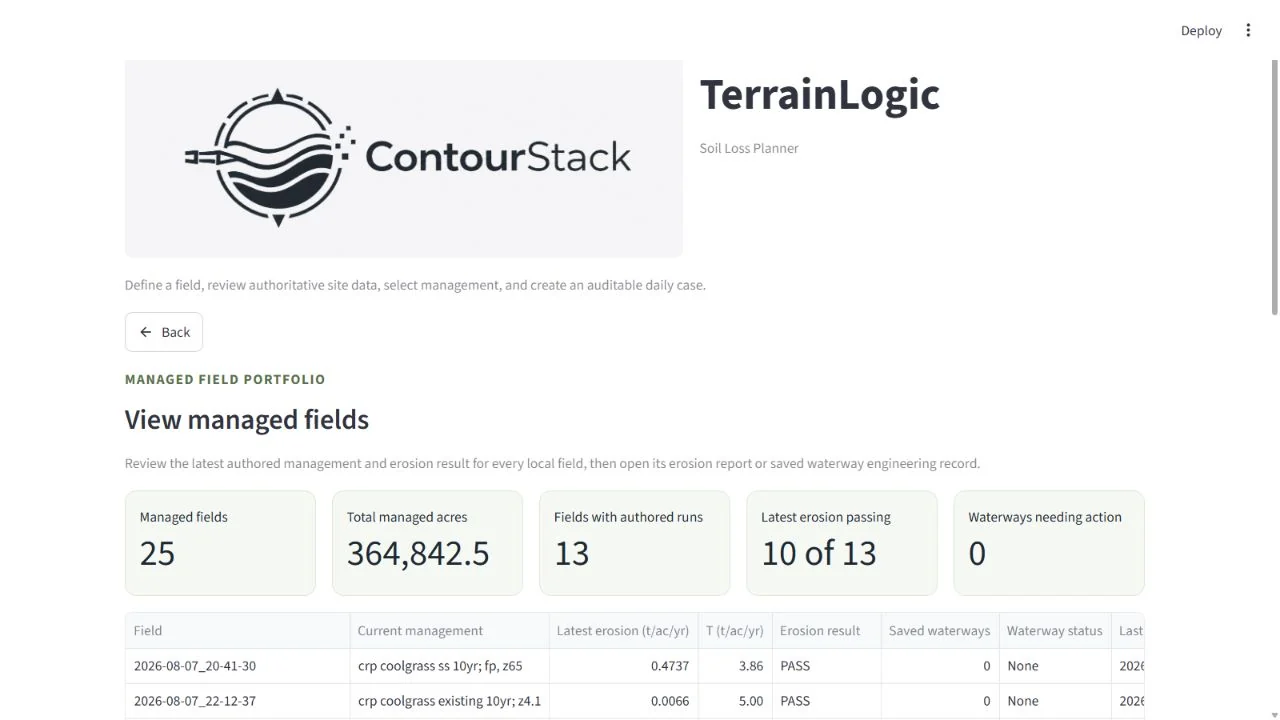
Add and organize fields
- Select Add a field to register a boundary and terrain data without authoring a management run.
- Use Customize managed-field table to add office-specific columns such as owner, tract, planner, priority, or notes.
- Edit custom values and select Save custom values.
- Search by name, management, date, or field ID; filter by PASS, FAIL, or Not determined.
Work with a selected field
- Review area, authored runs, current management, latest erosion, saved waterways, and saved terraces.
- Select Compare with a new management to create a view-only scenario from the current baseline.
- Open or download the latest erosion report.
- Create a field lifecycle report combining management cycles, A versus T, field state, practices, and inspections.
- Open a saved waterway for design review, as-built inspection, or routine inspection.
- Download a practice inspection report.
- Open or download a saved terrace engineering report.
- Review starting and ending physical-state history and prior erosion runs.
15 / Data and offline use
Your field records remain local.
TerrainLogic stores field geometry, cases, daily state, reports, management records, and engineering practices on the Windows computer or user-selected local folder. Public-data services are used to retrieve soils, elevation, climate, and related context. Previously cached site data can support later work without an internet connection.
Recommended office practice
- Back up the managed-field repository and project case folders routinely.
- Do not store the only copy of a field record in Downloads or a temporary folder.
- Use stable field names and office-specific custom columns.
- Keep exported PDFs with the project record, but preserve the machine-readable case folder too.
- Before moving to another computer, copy the complete repository rather than individual JSON files.
16 / Troubleshooting
Resolve the common problems first.
The map is gray or unavailable.
Enter a field name first. The map intentionally remains disabled until the record has a title. If a title exists, confirm that the application has finished loading.
Finish polygon is unavailable on a touchscreen.
Place at least three distinct points. The button becomes active when a valid polygon can be created. Avoid placing the third point directly on another point or line.
Public site data cannot be retrieved.
Confirm internet access, retry the site, and test the referenced public service in a browser. If the browser works but TerrainLogic fails, confirm that the signed current build is installed and that Windows trusts the ContourStack certificate chain.
Windows blocks the installer or a runtime file.
Use the current signed installer from the protected beta portal. Verify that the publisher is ContourStack LLC. Do not bypass an unknown-publisher warning. If an older unsigned build exists, remove it before reinstalling the signed build.
The first launch or first site is slow.
The first launch initializes the packaged Python runtime and security checks. The first site also downloads public data. Later launches and cached fields are faster.
A gully corridor is missing or misplaced.
Check the field boundary and DEM coverage, note any truncated catchment warning, and compare the screen with field evidence. Hotspots are terrain-based screening results and may be affected by culverts, subsurface drainage, roads, berms, or fine-scale grading not resolved by the DEM.
A report cannot be created.
Confirm that the analysis finished and the case folder still contains its saved JSON files. The full daily report specifically requires daily_state.json. Check write permission for the selected save folder.
A managed field does not show the expected run.
Confirm that the run was authored rather than view-only. A proposed comparison does not replace field history unless you explicitly save it as the new authored state.
I need to report a beta issue.
Send the field name, workflow, exact error, screenshot, app version, and whether the issue repeats to contourstack@gmail.com. Do not send private producer data unless authorized.
17 / Scope and limitations
Use the evidence at the level it supports.
- RUSLE2-aligned erosion output addresses sheet-and-rill erosion. Gully screening is a separate terrain workflow.
- Hotspots indicate potential concentrated-flow corridors and require field confirmation.
- Nutrient results are planning-level estimates and depend on supplied management, soil, nutrient, and hydrologic information.
- Waterway and terrace outputs are preliminary until verified against survey, hydrology, FOTG criteria, outlet conditions, permits, utilities, and professional requirements.
- Public datasets have their own scale, currency, completeness, and accuracy limits.
- Validation statistics describe the tested dataset and endpoint. They do not guarantee accuracy for every field or replace professional review.
For methods, validation statistics, and claim boundaries, see the science and validation record and technical reference.